Editing Values
Last updated on 2024-11-04
Overview
The data view can be used to import values from a source system, check them, and, if necessary, manually adjust them. The values are edited in the following areas:
- Some values can be edited directly in the data view itself. You can find additional information in Editing Values in the Data View.
- The history of a value or text, for example, can be displayed in the detail view, which can be opened for each value or text value from the data view. You can use the history to decide whether and which actions are to be performed, such as changing or restoring a value. You can find additional information in Editing Values in the Detail View.
- You can go from the data view for values for which a validation has been configured in a different document or that have been referenced from a different document directly into the respective underlying document and edit values there. You can find additional information in Editing Values in Linked Documents.
This article contains the following sections:
Editing Values in the Data View
Values in cells without highlighting and values in cells highlighted in blue or yellow (see Colors and Icons in the Data View) can be edited directly in the data view as follows:
Click the desired cell in the data view and adjust the value. Click Save to save your entries.
Editing Values in the Detail View
The data view is supplemented by the detail view. The history of a given value or text, for example, is displayed in the detail view. Based on the history, you can determine what actions need to be taken (if any). In the detail view, you can also re-enter user-defined values or restore values that have been entered in the past.
Values in cells without highlighting and values in cells highlighted in blue or yellow (see Colors and Icons in the Data View) can be edited directly in the detail view as follows:
- In the data view, click the info icon
 of the desired cell to open the detail page.
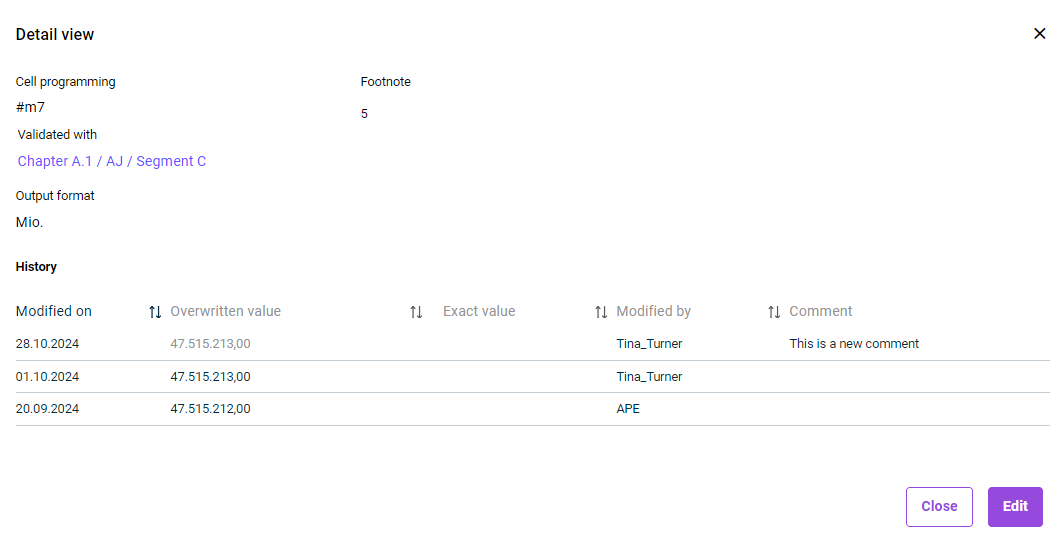
 - The detail view of a value or cell is displayed, for example, as follows:
 Detail page of a value or cell
 - Click Edit.
- Configure the details of the cell (see the section on the options in the detail view of a cell).
- Click Save to save your entries.
When you save, the changes you have made to values will be applied to the respective MS Excel file. - If you wish, you can then click Close to exit the detail view.
Once you have saved your entries and exited the detail view, the settings you have configured and/or the changes you have made will be indicated in colors in the data view:
- If an imported value (previously not highlighted in color) is manually overwritten and saved in the detail view, it will be highlighted in blue in the data view.
- If an imported value is restored in the detail view by means of the history, the highlighting of the cell will be reset in the data view.
- Cells for which you have entered a comment in the detail view are marked with a blue triangle in the data view.
(See also Colors and Symbols in the Data View)
Options in a Cell’s Detail View
Option
Description
Cell programming
Programming of a cell in the programming column of the corresponding MS Excel file.
The value in this cell can also be an account number, an ID, or another unique identifier.
For more information on changing the programming of an MS Excel file, please refer to the chapter on Defining Columns.
Validated with
If a validation of the value has been configured, the Excel document used to perform the validation is displayed.
Click the name of the document to open its data view and make any adjustments if necessary.
Referenced from
If the value is referenced from a different Excel document, the Excel document from which the value comes will be displayed here.
Click the name of the document to open its data view and make any adjustments if necessary.
Output format
Number format (thousands, millions, billions, etc.) for values used in the data view. The output format can be changed in MS Excel and in the document settings.
If you wish to change the output format of the data view, please refer to the chapter on Configuring Documents.
Footnote
Footnote added to this value. The footnote will appear next to the value within the table in the Word document that contains the Outarea and in the result document.
If a footnote has already been added to an Excel document (see Creating and Editing Columns), the footnote is displayed here and can be edited if necessary.
New user-defined value
- Value: Rounding values can be defined or updated here.
- Comment: This field enables the user to enter a comment. Comments must be saved in order for them to appear in the history.
History
History of the changes made to the value. The following columns will appear:
Modified on
The date on which a value was changed and/or a comment was entered.
Overwritten value
The original value before it was changed.
The value is transferred to the New user-defined value field by clicking . This function enables you to restore values whenever you wish.
Exact value
The exact value as it was stored on the specified date.
The warning triangle indicates that an imported, manually edited value has been overwritten by an import.
Modified by
The user who changed the value or entered a comment into the system on the date indicated.
Comment
A comment entered for the value in question.
Editing Values in Linked Documents
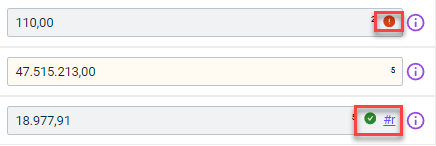
If the validation of a value has been configured in a different Excel document or the value referenced from a different Excel document, this is indicated accordingly in the data view (see Colors and Icons in the Data View):
 Marking for validated and referenced values
- Move the cursor over the respective icon.
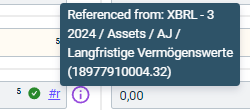
The underlying documents are displayed in a tooltip:

Tooltip with link to reference document - Do one of the following to open the data view of a linked document:
- Click the link icon (for one linked document)
- Click the document name in the tooltip (for several linked documents)
- If necessary, edit the value and save the data view.
The value edited in this way is transferred to all documents in which it is referenced.
